


Build your own unique freelance website with our free guide’s 9-step checklist.
The email you entered is invalid.
Thank you for subscribing.
By entering your email, you indicate that you have read and understood our Privacy Policy and agree to receive marketing from Squarespace.
Your photography website reflects your business. That's why it's important to put forth a professional online presence with high-quality images. This starts with making sure the photos you take are of high quality and ensuring these photos look good online, which may require some editing—both before and after they're posted.
Implementing website image optimization
Website image optimization involves several steps and options.
Color requirements for online images
Photos viewed on websites have different requirements than printed photos. For example, print photos are typically rendered with CMYK (cyan, magenta, yellow, and black) color profiles. These colors represent the inks used to print color graphics or images. In contrast, photos uploaded to the web are required to be in RGB (red, green, and blue) color mode with standard RGB (sRGB) color profile. This will ensure the images look crisp and natural via web browsers.
Optimizing image size
Images shared on the web will look different depending on how you're accessing them. For example, images viewed on a desktop computer or laptop are a larger size than they are when you access them via a tablet. In turn, images viewed on a mobile phone look smaller than on other devices. Accordingly, photos that are narrower in width don't look as good on a desktop browser, while photos with a lot of detail might look blurry or indistinct on a mobile phone.
Optimizing images for website load time
The number and size of images on a particular page will affect your website's load time—the measure of how long it takes content to be available to a viewer. Larger images take longer to load than smaller images. When you have multiple large images on a page, it can significantly slow down how quickly your site appears. This might affect your traffic and cause people to leave your site in frustration before viewing what you have to offer.
Image formatting requirements
Different web hosting services have different file format requirements. For example, Squarespace accepts common image file extensions (.jpg, .gif, or .png.) The name of an image file needs to follow certain specifications. Files uploaded to Squarespace should only contain letters, numbers, underscores, and hyphens. If uploaded images have a name with special characters or punctuation, they might not load properly.
Reducing image file size
Learning how to reduce image file size is one major way to optimize images for the web. You can upload images that are up to 20MB in size to Squarespace. However, it's recommended that the images are less than 500KB, so they load faster on a website.
Photo editing applications allow you to reduce image file size. This can be achieved by reducing the photo dimensions. For example, instead of a photo being 5000 pixels across, it will still look crisp if reduced to 2500 pixels.
Another way to reduce image file size is through image compression. Photos in the JPEG format especially maintain their sharpness when compressed. You can compress images using photo editing programs. One Squarespace Extension, TinyIMG, can help you optimize your image sizes and even help you optimize filenames and alt text for SEO.
Improving image quality
Obtaining high-quality photos starts before you upload images to a website. In fact, you can improve image quality by making sure your camera settings are calibrated for higher-resolution photos. This means adjusting a measurement called dots per inch (DPI) or pixels per inch (PPI). High-resolution photos are a minimum of 300DPI. This is the ideal measurement for print photos, too.
When you upload photos to your photography website, make sure they are high-resolution images. Squarespace websites follow the principles of responsive design. This means that your photos are automatically resized so they look good on every device.
Squarespace also recommends uploading images that are between 1500 and 2500 pixels wide. That size ensures the images will maintain their sharpness when resized.
Using photo editing tools
Not all of us take perfect photos all the time. Sometimes you take a fantastic photo that is slightly blurry or overexposed. Photo editing tools can fix these small blemishes.
Stand-alone photo editing programs allow you to edit and improve photos before you upload them. There are a number of online programs or mobile applications that give you the option to fix photos in your web browser and via your phone, respectively.
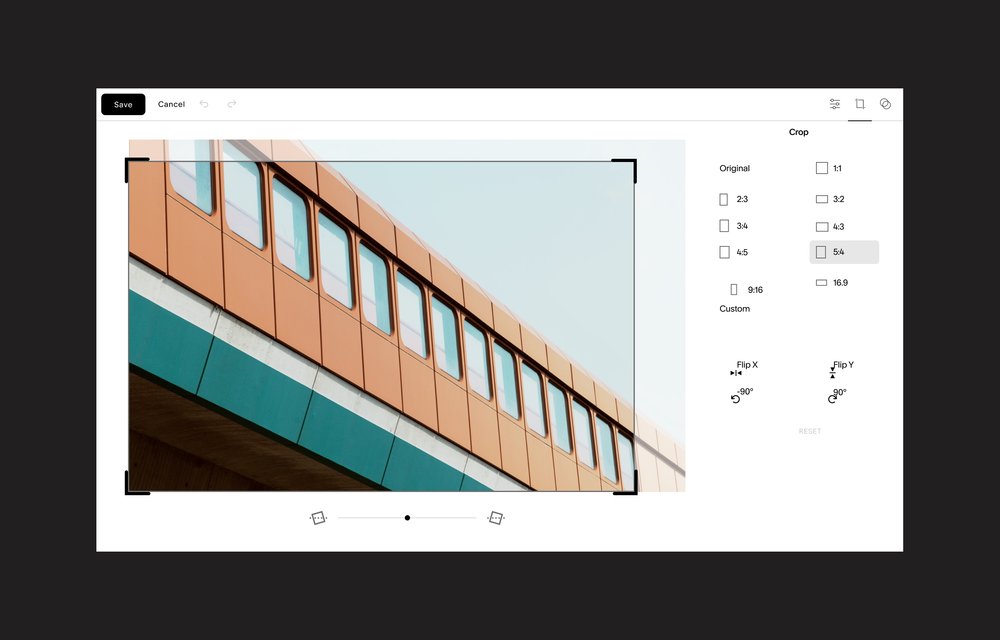
Squarespace offers a suite of editing tools within the content management system (CMS) that gives users the power to adjust how photos look on your website. Within the gallery view, you can control the shape of the images. Also called aspect ratio, this describes the relationship between your image’s height and width.
The CMS also allows you to fine-tune the appearance of an individual photo. These include options such as brightness, contrast, and saturation, all of which change the color of your photos; sharpness and blur, which affect the crispness and clarity of images; and highlights and shadows, which add depth and contours.